Integration Guides
The SDK supports the following connection methods:
Cloud (PAX/Telpo)
Introduction
Let's start programming!
1. Create a C# class
Create a new C# class called MyClass and include com.handpoint.api as a dependency :
using System;
using System.Collections.Generic;
using System.Numerics;
using com.handpoint.api;

namespace GettingStartedApp
{
    class MyClass
    {
    }
}
2. Initialize the API
using System;
using System.Collections.Generic;
using System.Numerics;
using com.handpoint.api;

namespace GettingStartedApp
{
    class MyClass
    {
        Hapi api;

        public MyClass()
        {
            InitApi();
        }

        public void InitApi()
        {
            string sharedSecret = "0102030405060708091011121314151617181920212223242526272829303132";
            string apikey = "This-is-my-api-key-provided-by-Handpoint";
            api = HapiFactory.GetAsyncInterface(this, new HandpointCredentials(sharedSecret, apikey));
            // The api is now initialized. Yay! we've even set default credentials.
            // The shared secret is a unique string shared between the payment terminal and your application, it is a free field.
            // The Api key is a unique key per merchant used to authenticate the terminal against the Cloud.
            // You should replace the API key with the one sent by the Handpoint support team.
        }
    }
}
3. Implement the mandatory Events(Events.Required) and per recommendation Status events (Events.Status)
using System;
using System.Collections.Generic;
using System.Numerics;
using com.handpoint.api;

namespace GettingStartedApp
{
    class MyClass : Events.Required, Events.Status
    {
        Hapi api;
        Device myDevice;

        public MyClass()
        {
            InitApi();
        }

        public void InitApi()
        {
            string sharedSecret = "0102030405060708091011121314151617181920212223242526272829303132";
            string apikey = "This-is-my-api-key-provided-by-Handpoint"
            api = HapiFactory.GetAsyncInterface(this, new HandpointCredentials(sharedSecret, apikey));
        }

        public void DeviceDiscoveryFinished(List Device devices)
        {
          // here you get a list of payment terminals associated with the api key.
        }

        public void EndOfTransaction(TransactionResult transactionResult, Device device)
        {
          // The TransactionResult object holds details about the transaction as well as the receipts.
          // Useful information can be accessed through this object like the transaction ID, the amount, etc.
        }

        public void ConnectionStatusChanged(ConnectionStatus status, Device device)
        {
            // The ConnectionStatus object holds details about the status regarding the connection to the target device.
        }

        public void CurrentTransactionStatus(StatusInfo info, Device device)
        {
            // The StatusInfo object holds details about the status and step taken during the transaction.
        }

        public void SignatureRequired(SignatureRequest request, Device device)
        {
            // Ignore for a PAX/Telpo integration. The complete signature capture process
            // is already handled in the sdk, a dialog will prompt the user for a signature if required.
            // If a signature was entered, it should be printed on the receipts.
        }

        public void HardwareStatusChanged(HardwareStatus status, ConnectionMethod hardware)
        {
            // Ignore, legacy event, will be deleted in future version.
        }
    }
}
4. Add a method to list the terminals of your merchant and connect to one of them Ensure that the card reader and PC are correctly paired via Cloud connection.
public void DiscoverDevices()
{
    // This triggers the search for all the cloud devices related to your Api Key.
    api.SearchDevices(ConnectionMethod.CLOUD);
}

public void DeviceDiscoveryFinished(List Device devices)
{
    foreach (Device device in devices)
    {
        if (device.Name != null)
        {
            if (device.Name.Equals("CloudDevice"))
            // Put the name of your device

            {
                this.myDevice = device;
              //We'll remember the device for this session, it is nice if you would do that too
              api.Connect(this.myDevice);
              //Connection to the device is handled automatically by the api
            }
        }
    }
}
5. Add a method to connect directly to the payment terminal Instead of discovering terminals you can also connect directly to one of them:
public void DirectConnect()
{
    Device device = new Device("CloudDevice", "0821032395-PAXA920", "", ConnectionMethod.CLOUD);
    // new Device("name", "address", "port (optional)", ConnectionMethod);
    // The address always has to be written in UPPER CASE
    // It is the composition of the serial number and model ot the payment terminal.
    // Example for a PAX A920 device: serial_number - model  -> 0821032395-PAXA920
    api.Connect(device);
}
6. Add a method to take payments
public OperationStartResult Pay()
{
    return api.Sale(new BigInteger(1000), Currency.EUR);
    // Let´s start our first transaction for 10 euros
    // The amount should always be in the minor unit of the currency
}
7. Add a method to get the transactions status
This functionality is only available for SmartPos devices (PAX).
public TransactionResult GetTransactionStatus(String transactionReference)
{
    return api.GetTransactionStatus(transactionReference);
}
8. Add a method to disconnect from the card reader
public void Disconnect()
{
    api.Disconnect();
}
9. Eventually, MyClass.cs must look like this after implementing all the necessary methods :
using System;
using System.Collections.Generic;
using System.Numerics;
using com.handpoint.api;

namespace GettingStartedApp
{
    class MyClass : Events.Required, Events.Status
    {
        Hapi api;
        Device myDevice;

        public MyClass(Form1 form1)
        {
            InitApi();
        }

        public void InitApi()
        {
            string sharedSecret = "0102030405060708091011121314151617181920212223242526272829303132";
            string apikey = "This-is-my-api-key-provided-by-Handpoint"
            api = HapiFactory.GetAsyncInterface(this, new HandpointCredentials(sharedSecret, apikey));
        }

        public void DiscoverDevices()
        {
            api.SearchDevices(ConnectionMethod.CLOUD);
        }

        public void DeviceDiscoveryFinished(List Device devices)
        {
            foreach (Device device in devices)
            {
                if (device.Name != null)
                {
                    if (device.Name.Equals("CloudDevice"))

                    {
                        this.myDevice = device;
                        api.Connect(this.myDevice);
                    }
                }
            }
        }

        public void DirectConnect()
        {
            Device device = new Device("CloudDevice", "0821032395-PAXA920", "", ConnectionMethod.CLOUD);
            api.Connect(device);
        }

        public OperationStartResult Pay()
        {
            return api.Sale(new BigInteger(1000), Currency.EUR);
            // Let´s start our first transaction for 10 euros
            // The amount should always be in the minor unit of the currency
        }

        public TransactionResult GetTransactionStatus(String transactionReference)
        {
            return api.GetTransactionStatus(transactionReference);
        }

        public void Disconnect()
        {
            api.Disconnect();
        }

        public void ConnectionStatusChanged(ConnectionStatus status, Device device)
        {
            Console.WriteLine("*** ConnectionStatus *** " + status);
        }

        public void CurrentTransactionStatus(StatusInfo info, Device device)
        {
            Console.WriteLine("*** CurrentTransactionStatus *** " + info.Status.ToString());
        }

        public void EndOfTransaction(TransactionResult result, Device device)
        {
            Console.WriteLine("*** EndOfTransaction *** " + result.ToJSON());
        }

        public void HardwareStatusChanged(HardwareStatus status, ConnectionMethod hardware)
        {
            //Ignore
        }

        public void SignatureRequired(SignatureRequest request, Device device)
        {
            //Ignore
        }
    }
}
Let's create a User Interface!
1. Create buttons and labels
- Go to your user interface (usually Form1.cs[Design])
- Select View > Toolbox
- In the toolbox, under “Common Controls” drag and drop 4 button items to the user interface
- Select "button1" > Right-Click > Properties
- Change the attribute "Name" from "button1" to "PayButton"
- Change the attribute "text" from "button1" to "Pay Now"
- Change the attribute "Name" from "button2" to "GetTransactionStatusButton"
- Change the attribute "text" from "button2" to "Get Transaction Status"
- Change the attribute "Name" from "button3" to "ConnectButton"
- Change the attribute "text" from "button3" to "Connect To Card reader"
- Change the attribute "Name" from "button4" to "DisconnectButton"
- Change the attribute "text" from "button4" to "Disconnect From Card Reader"
- Select View > Toolbox > Common Controls > Label
- Change the attribute "Name" from "label1" to "ConnectionLabel"
- Change the attribute "text" from "label1" to "Disconnected"
- Change the attribute "backColor" from "label1" to "Red"
2. Create WebBrowsers Now that we have our 3 buttons, let´s create two webBrowsers items to display the merchant receipt as well as the cardholder´s receipt at the end of the transaction.
- Select View > Toolbox > Common Controls > WebBrowser
- Drag and drop two web browsers to the user interface
- Select View > Toolbox > Common Controls > Label
- Drag and drop two labels to the user interface in order to identify the webBrowser items
- Change the attribute "Name" from the left webBrowser to "MerchantReceiptBrowser"
- Change the attribute "Name" from the right webBrowser to "CardholderReceiptBrowser"
- Change the attribute "Name" from "label2" to "MerchantReceiptLabel"
- Change the attribute "text" from "label2" to "Merchant Receipt :"
- Change the attribute "Name" from "label3" to "CardholderReceiptLabel"
- Change the attribute "text" from "label3" to "Cardholder Receipt :"
Let's link our user interface with methods!
1. Referencing the user interface(Form1.cs) in MyClass
In MyClass.cs, create an instance of Form1 called UIClass and initialize it. Instantiate MyClass and add form1 as a parameter for the Class.
class MyClass : Events.Required, Events.Status
{
    Hapi api;
    Device myDevice;
    private Form1 uIClass;

    public MyClass(Form1 form1)
    {
        uIClass = form1;
        InitApi();
    }

    [...]
}
2. Referencing Myclass in Form1.cs and link methods to the user interface Go to Form1.cs[Design] and double click on the button "Pay Now". By Double Clicking on it you created a method called PayButton_Click. Do the same with the button "Get Transaction Status". Create a new instance of MyClass called "my" in Form1.cs then, inside the new method PayButton_Click call the Pay() method from MyClass.
using System;
using System.Drawing;
using System.Windows.Forms;

namespace GettingStartedApp
{
    public partial class Form1 : Form
    {
        MyClass my;
        public Form1()
        {
            InitializeComponent();
            my = new MyClass(this);
        }
        private void PayButton_Click(object sender, EventArgs e)
        {
            my.Pay();
        }

        private void GetTransactionStatusButton_Click(object sender, EventArgs e)
        {
            //Use a transactionReference from your own transactions. 91ff1ed2-beee-44ca-96f9-9acec74dc659 is a test transactionReference
            my.GetTransactionStatus("91ff1ed2-beee-44ca-96f9-9acec74dc659");
        }
    }
}
Go back to Form1.cs[Design] and double click on each of the other buttons to automatically generate an OnClick method in Form1.cs. Link each of the buttons to the correct methods in MyClass.cs.
using System;
using System.Drawing;
using System.Windows.Forms;

namespace GettingStartedApp
{
    public partial class Form1 : Form
    {
        MyClass my;
        public Form1()
        {
            InitializeComponent();
            my = new MyClass(this);
        }

        private void PayButton_Click(object sender, EventArgs e)
        {
            my.Pay();
        }

        private void GetTransactionStatusButton_Click(object sender, EventArgs e)
        {
            //Use a transactionReference from your own transactions. 91ff1ed2-beee-44ca-96f9-9acec74dc659 is a test transactionReference
            my.GetTransactionStatus("91ff1ed2-beee-44ca-96f9-9acec74dc659");
        }

        private void ConnectButton_Click(object sender, EventArgs e)
        {
            //my.DiscoverDevices();
            my.DirectConnect();
        }

        private void DisconnectButton_Click(object sender, EventArgs e)
        {
            my.Disconnect();
        }
    }
}
Let´s notify the user when the app is connected and ready to send the transaction
1. Update the ConnectionLabel to notify the user of the connection status Get the connection status from the method ConnectionStatusChanged in MyClass.cs.
public void ConnectionStatusChanged(ConnectionStatus status, Device device)
{
    Console.WriteLine("*** ConnectionStatus *** " + status);
    if (status == ConnectionStatus.Connected)
    {
        uIClass.UpdateLabel(true);
    }
    else
    {
        uIClass.UpdateLabel(false);
    }
}

public void CurrentTransactionStatus(StatusInfo info, Device device)
{
    //Let also console log the status during the transaction
    Console.WriteLine("*** CurrentTransactionStatus *** " + info.Status.ToString());
}
2. Create the UpdateLabel method in Form1.cs
public delegate void UpdateConnectionLabel(bool Connected);
public void UpdateLabel(bool Connected)
{
    //Only need to check for one of the webbrowsers
    if (ConnectionLabel.InvokeRequired)
    {
        UpdateConnectionLabel d = new UpdateConnectionLabel(UpdateLabel);
        this.Invoke(d, new object[] { Connected });
    }
    else
    {
        if (Connected)
        {
            ConnectionLabel.Text = "Connected";
            ConnectionLabel.BackColor = Color.Green;
        }
        else {
            ConnectionLabel.Text = "Disconnected";
            ConnectionLabel.BackColor = Color.Red;
        }
    }
}
Let´s display the receipts at the end of a transaction!
1. Fetch the cardholder's and merchant receipts from the method EndOfTransaction in MyClass At this point all the buttons are connected but we are still missing to display the receipts in the webBrowsers. First, let´s get the receipts from the method EndOfTransaction in myClass.cs.
public void EndOfTransaction(TransactionResult transactionResult, Device device)
{
    Console.WriteLine("*** EndOfTransaction *** " + result.ToJSON());
    uIClass.DisplayReceipts(result.MerchantReceipt, result.CustomerReceipt);
}
2. Create the DisplayReceipts method in Form1.cs
public delegate void UpdateReceiptsCallback(string MerchantReceipt, string CustomerReceipt);
public void DisplayReceipts(string MerchantReceipt, string CustomerReceipt)
{
    //Only need to check for one of the webbrowsers
    if (MerchantReceiptBrowser.InvokeRequired)
    {
        UpdateReceiptsCallback d = new UpdateReceiptsCallback(DisplayReceipts);
        this.Invoke(d, new object[] { MerchantReceipt, CustomerReceipt });
    }
    else
    {
        MerchantReceiptBrowser.DocumentText = MerchantReceipt;
        CardholderReceiptBrowser.DocumentText = CustomerReceipt;
    }
}
Final Result!
Here is how MyClass.cs and Form1.cs must eventually look like:
1. MyClass.cs :
using System;
using System.Collections.Generic;
using System.Numerics;
using com.handpoint.api;

namespace GettingStartedApp
{
    class MyClass : Events.Required, Events.Status
    {
        Hapi api;
        Device myDevice;
        private Form1 uIClass;

        public MyClass(Form1 form1)
        {
            uIClass = form1;
            InitApi();
        }

        public void InitApi()
        {
            string sharedSecret = "0102030405060708091011121314151617181920212223242526272829303132";
            string apikey = "This-is-my-api-key-provided-by-Handpoint"
            api = HapiFactory.GetAsyncInterface(this, new HandpointCredentials(sharedSecret, apikey));
        }

        public void DiscoverDevices()
        {
            api.SearchDevices(ConnectionMethod.CLOUD);
        }

        public void DirectConnect()
        {
            Device device = new Device("CloudDevice", "0821032398-PAXA920", "", ConnectionMethod.CLOUD);
            api.Connect(device);
        }

        public OperationStartResult Pay()
        {
            //A new sale operation will generate a transactionReference that can be used
            //to check the status of the transaction (GetTransactionStatus)
            return api.Sale(new BigInteger(1000), Currency.EUR);
        }

        public TransactionResult GetTransactionStatus(String transactionReference)
        {
            return api.GetTransactionStatus(transactionReference);
        }

        public void Disconnect()
        {
            api.Disconnect();
        }

        public void ConnectionStatusChanged(ConnectionStatus status, Device device)
        {
            Console.WriteLine("***ConnectionStatus*** " + status);
            if (status == ConnectionStatus.Connected)
            {
                uIClass.UpdateLabel(true);
            }
            else
            {
                uIClass.UpdateLabel(false);
            }
        }

        public void CurrentTransactionStatus(StatusInfo info, Device device)
        {
            //Let's log also the status during the transaction
            Console.WriteLine("*** CurrentTransactionStatus *** " + info.Status.ToString());
        }

        public void DeviceDiscoveryFinished(List Device devices)
        {
            foreach (Device device in devices)
            {
                if (device.Name != null)
                {
                    if (device.Name.Equals("CloudDevice"))
                    {
                        this.myDevice = device;
                        api.Connect(this.myDevice);
                    }
                }
            }
        }

        public void EndOfTransaction(TransactionResult result, Device device)
        {
            Console.WriteLine("*** EndOfTransaction *** " + result.ToJSON());
            uIClass.DisplayReceipts(result.MerchantReceipt, result.CustomerReceipt);
        }

        public void HardwareStatusChanged(HardwareStatus status, ConnectionMethod hardware)
        {
            //Ignore
        }

        public void SignatureRequired(SignatureRequest request, Device device)
        {
            //Ignore
        }
    }
}
2. Form1.cs :
    using System;
    using System.Drawing;
    using System.Windows.Forms;

    namespace GettingStartedApp
    {
        public partial class Form1 : Form
        {
            MyClass my;
            public Form1()
            {
                InitializeComponent();
                my = new MyClass(this);
            }

            private void PayButton_Click(object sender, EventArgs e)
            {
                my.Pay();
            }

            private void GetTransactionStatusButton_Click(object sender, EventArgs e)
            {
                //Use a transactionReference from your own transactions. 91ff1ed2-beee-44ca-96f9-9acec74dc659 is a test transactionReference
                my.GetTransactionStatus("91ff1ed2-beee-44ca-96f9-9acec74dc659");
            }

            private void ConnectButton_Click(object sender, EventArgs e)
            {
                my.DirectConnect();
            }

            private void DisconnectButton_Click(object sender, EventArgs e)
            {
                my.Disconnect();
            }

            public delegate void UpdateReceiptsCallback(string MerchantReceipt, string CustomerReceipt);
            public void DisplayReceipts(string MerchantReceipt, string CustomerReceipt)
            {
                //Only need to check for one of the webbrowsers
                if (MerchantReceiptBrowser.InvokeRequired)
                {
                    UpdateReceiptsCallback d = new UpdateReceiptsCallback(DisplayReceipts);
                    this.Invoke(d, new object[] { MerchantReceipt, CustomerReceipt });
                }
                else
                {
                    MerchantReceiptBrowser.DocumentText = MerchantReceipt;
                    CardholderReceiptBrowser.DocumentText = CustomerReceipt;
                }
            }

            public delegate void UpdateConnectionLabel(bool connected);

            public void UpdateLabel(bool Connected)
            {
                //Only need to check for one of the webbrowsers
                if (ConnectionLabel.InvokeRequired)
                {
                    UpdateConnectionLabel d = new UpdateConnectionLabel(UpdateLabel);
                    this.Invoke(d, new object[] { Connected });
                }
                else
                {
                    if (Connected)
                    {
                        ConnectionLabel.Text = "Connected";
                        ConnectionLabel.BackColor = Color.Green;
                    }
                    else {
                        ConnectionLabel.Text = "Disconnected";
                        ConnectionLabel.BackColor = Color.Red;
                    }
                }
            }

        }
    }
Let's run our program!
Run the program by clicking the "play" button :
- Click on "Connect To Card Reader", this can take a little bit of time (10 sec max) due to the fact that we are looking for all the devices around before connecting to a specific one
- Click "Pay Now"
- Follow the instructions on the card reader
- When the transaction is finished, the receipts should be displayed in the webBrowsers.
- Click "Get Transaction Status", you will get the transaction Status from the used transactionReference
- Click on "Disconnect From Card Reader" to stop the connection with the card reader
Bluetooth (HiLite)
Introduction
This tutorial is guiding you through all the steps to create a basic payment application for Windows devices integrated with an HiLite terminal.
The new generation of Handpoint SDK's is designed to make your life easier. Simple and created for humans, it does not require any specific knowledge of the payment industry to be able to start accepting credit/debit card transactions.
At Handpoint we take care of securing every transaction so you don´t have to worry about it while creating your application. We encrypt data from the payment terminal to the bank with our point-to-point encryption solution. Our platform is always up to the latest PCI-DSS security requirements.
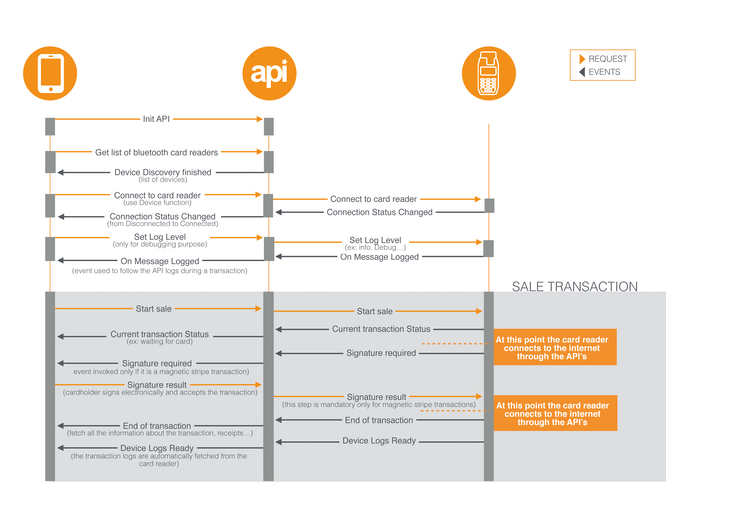
How to implement a Sale Transaction
The below flow chart shows the interaction between the SDK, the payment terminal and your application. The orange arrows represent methods (requests) that need to be invoked to communicate with the Handpoint SDK's. The dark arrows represent events that need to be integrated in your code in order to retrieve information from the SDK´s and the card reader.
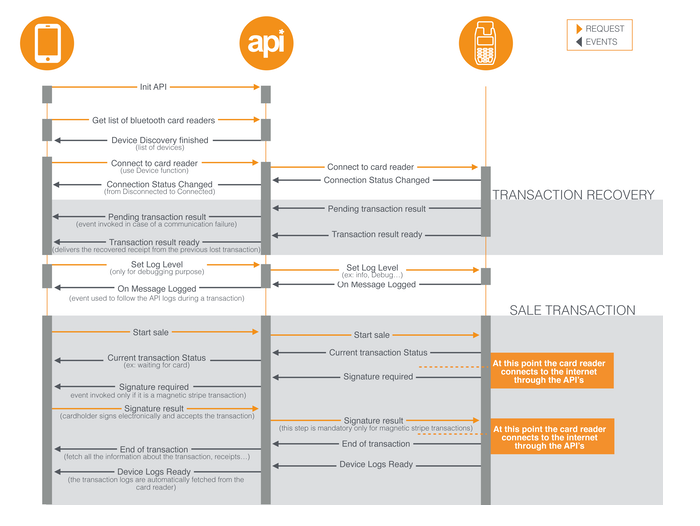
How to implement a Sale Transaction with Recovery feature
At some point, the connection between the SDK and the card reader can become unstable. For example, the Bluetooth connection can be cut in the middle of a sale transaction if the smartphone runs out of battery. If this happens, you need to have implemented the “transaction recovery feature” in order to get the receipts from the previous transaction and knowing if it was successful despite the connection problem.
Let's start programming!
1. Create a C# class Create a new C# class called MyClass and include com.handpoint.api as a dependency :
using System;
using System.Collections.Generic;
using System.Numerics;
using com.handpoint.api;

namespace GettingStartedApp
{
    class MyClass
    {
    }
}
2. Initialize the API
using System;
using System.Collections.Generic;
using System.Numerics;
using com.handpoint.api;

namespace GettingStartedApp
{
    class MyClass
    {
        Hapi api;

        public MyClass()
        {
            InitApi();
        }

        public void InitApi()
        {
            string sharedSecret = "0102030405060708091011121314151617181920212223242526272829303132";
            api = HapiFactory.GetAsyncInterface(this, new HandpointCredentials(sharedSecret));
            // The api is now initialized. Yay! we've even set a default shared secret!
            // The shared secret is a unique string shared between the card reader and your mobile application.
            // It prevents other people to connect to your card reader.
            // You should replace this default shared secret by the one sent by our support team.
        }
    }
}
3. Implement the mandatory Events(Events.Required) and per recommendation Status events (Events.Status)
using System;
using System.Collections.Generic;
using System.Numerics;
using com.handpoint.api;

namespace GettingStartedApp
{
    class MyClass : Events.Required, Events.Status
    {
        Hapi api;
        Device myDevice;

        public MyClass()
        {
            InitApi();
        }

        public void InitApi()
        {
            string sharedSecret = "0102030405060708091011121314151617181920212223242526272829303132";
            api = HapiFactory.GetAsyncInterface(this, new HandpointCredentials(sharedSecret));
        }

        public void DeviceDiscoveryFinished(List Device devices)
        {
            // Here you get a list of Bluetooth payment terminals paired with your computer
        }

        public void EndOfTransaction(TransactionResult transactionResult, Device device)
        {
          // The TransactionResult object holds details about the transaction as well as the receipts.
          // Useful information can be accessed through this object like the transaction ID, the amount, etc.
        }

        public void ConnectionStatusChanged(ConnectionStatus status, Device device)
        {
            // The ConnectionStatus object holds details about the status regarding the connection to the target device.
        }

        public void CurrentTransactionStatus(StatusInfo info, Device device)
        {
            // The StatusInfo object holds details about the status and step taken during the transaction.
        }

        public void SignatureRequired(SignatureRequest signatureRequest, Device device)
        {
            // You'll be notified here if a sale process needs a signature verification
            // A signature verification is needed if the cardholder uses an MSR or a chip & signature card
            // This method will not be invoked if a transaction is made with a Chip & PIN card

            api.SignatureResult(true); // This line means that the cardholder ALWAYS accepts to sign the receipt.
            // A specific line will be displayed on the merchant receipt for the cardholder to be able to sign it
        }

        public void HardwareStatusChanged(HardwareStatus status, ConnectionMethod hardware)
        {
            // Ignore, legacy event, will be deleted in future version.
        }
    }
}
4. Add a method to discover surrounding devices and connect to the card reader Ensure that the card reader and PC are correctly paired via bluetooth.
public void DiscoverDevices()
{
    api.ListDevices(ConnectionMethod.BLUETOOTH);
    // This triggers the search for all the bluetooth devices around.
    // You can also search for USB and Serial as a connection method
}

public void DeviceDiscoveryFinished(List Device devices)
{
    foreach (Device device in devices)
    {
        if (device.Name != null)
        {
            if (device.Name.Equals("PP0513901435"))
            // Put the name of your device, find it by doing C then up arrow on your card reader keypad
            {
                this.device = device;
                //We'll remember the device for this session, it is nice if you would do that too
                api.Connect(this.device);
                //Connection to the device is handled automatically in the API
            }
        }
    }
}
5. Add a method to connect directly to the card reader Instead of discovering the surrounding devices you can also directly connect to the card reader by implementing the following method:
public void DirectConnect()
{
    Device device = new Device("PP0513901435", "68:AA:D2:00:D5:27", "", ConnectionMethod.BLUETOOTH);
    //new Device("name", "address", "port", ConnectionMethod);
    //The address always has to be written in UPPER CASE
    api.Connect(device);
}
6. Add a method to take payments
public bool Pay()
{
    return api.Sale(new BigInteger(1000), Currency.GBP);
    // Let´s start our first payment of 10 pounds
}
7. Add a method to disconnect from the card reader
public void Disconnect()
{
    api.Disconnect();
}
8. Eventually, MyClass.cs must look like this after implementing all the necessary methods :
using System;
using System.Collections.Generic;
using System.Numerics;
using com.handpoint.api;

namespace GettingStartedApp
{
    class MyClass : Events.Required, Events.Status
    {
        Hapi api;
        Device myDevice;

        public MyClass(Form1 form1)
        {
            InitApi();
        }

        public void InitApi()
        {
            string sharedSecret = "0102030405060708091011121314151617181920212223242526272829303132";
            api = HapiFactory.GetAsyncInterface(this, new HandpointCredentials(sharedSecret));
        }

        public void DiscoverDevices()
        {
            api.SearchDevices(ConnectionMethod.BLUETOOTH);
        }

        public void DeviceDiscoveryFinished(List Device devices)
        {
            foreach (Device device in devices)
            {
                if (device.Name != null)
                {
                    if (device.Name.Equals("PP0513901435"))
                    {
                        this.device = device;
                        api.Connect(this.device);
                    }
                }
            }
        }

        public void DirectConnect()
        {
            Device device = new Device("PP0513901435", "68:AA:D2:00:D5:27", "", ConnectionMethod.BLUETOOTH);
            api.Connect(device);
        }

        public bool Pay()
        {
            return api.Sale(new BigInteger(1000), Currency.GPB);
        }

        public void Disconnect()
        {
            api.Disconnect();
        }

        public void ConnectionStatusChanged(ConnectionStatus status, Device device)
        {
            Console.WriteLine("*** ConnectionStatus *** " + status);
        }

        public void CurrentTransactionStatus(StatusInfo info, Device device)
        {
            Console.WriteLine("*** CurrentTransactionStatus *** " + info.Status.ToString());
        }

        public void SignatureRequired(SignatureRequest signatureRequest, Device device)
        {
                api.SignatureResult(true);
        }

        public void EndOfTransaction(TransactionResult result, Device device)
        {
            Console.WriteLine("*** EndOfTransaction *** " + result.ToJSON());
        }

        public void HardwareStatusChanged(HardwareStatus status, ConnectionMethod hardware)
        {
            //Ignore
        }
    }
}
Let's create a User Interface!
1. Create buttons
- Go to your user interface (usually Form1.cs[Design])
- Select View > Toolbox
- In the toolbox, under “Common Controls” drag and drop 3 button items to the user interface
- Select "button1" > Right-Click > Properties
- Change the attribute "Name" from "button1" to "PayButton"
- Change the attribute "text" from "button1" to "Pay Now"
- Change the attribute "Name" from "button2" to "ConnectButton"
- Change the attribute "text" from "button2" to "Connect To Card reader"
- Change the attribute "Name" from "button3" to "DisconnectButton"
- Change the attribute "text" from "button3" to "Disconnect From Card Reader"
- Select View > Toolbox > Common Controls > Label
- Change the attribute "Name" from "label1" to "ConnectionLabel"
- Change the attribute "text" from "label1" to "Disconnected"
- Change the attribute "backColor" from "label1" to "Red"
2. Create WebBrowsers
Now that we have our 3 buttons, let´s create two webBrowsers items to display the merchant receipt as well as the cardholder´s receipt at the end of the transaction.
- Select View > Toolbox > Common Controls > WebBrowser
- Drag and drop two web browsers to the user interface
- Select View > Toolbox > Common Controls > Label
- Drag and drop two labels to the user interface in order to identify the webBrowser items
- Change the attribute "Name" from the left webBrowser to "MerchantReceiptBrowser"
- Change the attribute "Name" from the right webBrowser to "CardholderReceiptBrowser"
- Change the attribute "Name" from "label2" to "MerchantReceiptLabel"
- Change the attribute "text" from "label2" to "Merchant Receipt :"
- Change the attribute "Name" from "label3" to "CardholderReceiptLabel"
- Change the attribute "text" from "label3" to "Cardholder Receipt :"
Let's link our user interface with methods!
1. Referencing the user interface(Form1.cs) in MyClass
In MyClass.cs, create an instance of Form1 called UIClass and initialize it. Instantiate MyClass and add form1 as a parameter for the Class.
class MyClass : Events.Required, Events.Status
{
    Hapi api;
    Device myDevice;
    private Form1 uIClass;

    public MyClass(Form1 form1)
    {
        uIClass = form1;
        InitApi();
    }

    [...]
}
2. Referencing Myclass in Form1.cs and link methods to the user interface
Go to Form1.cs[Design] and double click on the button "Pay Now". By Double Clicking on it you created a method called PayButton_Click. Create a new instance of MyClass called "my" in Form1.cs then, inside the new method PayButton_Click call the Pay() method from MyClass.
using System;
using System.Drawing;
using System.Windows.Forms;

namespace GettingStartedApp
{
    public partial class Form1 : Form
    {
        MyClass my;
        public Form1()
        {
            InitializeComponent();
            my = new MyClass(this);
        }
        private void PayButton_Click(object sender, EventArgs e)
        {
            my.Pay();
        }
        private void GetTransactionStatusButton_Click(object sender, EventArgs e)
        {
            //Use a transactionReference from your own transactions. 91ff1ed2-beee-44ca-96f9-9acec74dc659 is a test transactionReference
            my.GetTransactionStatus("91ff1ed2-beee-44ca-96f9-9acec74dc659");
        }
    }
}
Go back to Form1.cs[Design] and double click on each of the other buttons to automatically generate an OnClick method in Form1.cs. Link each of the buttons to the correct methods in MyClass.cs.
using System;
using System.Drawing;
using System.Windows.Forms;

namespace GettingStartedApp
{
    public partial class Form1 : Form
    {
        MyClass my;
        public Form1()
        {
            InitializeComponent();
            my = new MyClass(this);
        }

        private void PayButton_Click(object sender, EventArgs e)
        {
            my.Pay();
        }

        private void ConnectButton_Click(object sender, EventArgs e)
        {
            //my.DiscoverDevices();
            my.DirectConnect();
        }

        private void DisconnectButton_Click(object sender, EventArgs e)
        {
            my.Disconnect();
        }
    }
}
Let´s notify the user when the app is connected and ready to send the transaction
Update the ConnectionLabel to notify the user of the connection status Get the connection status from the method ConnectionStatusChanged in MyClass.cs.
public void ConnectionStatusChanged(ConnectionStatus status, Device device)
{
    Console.WriteLine("*** ConnectionStatus *** " + status);
    if (status == ConnectionStatus.Connected)
    {
        uIClass.UpdateLabel(true);
    }
    else
    {
        uIClass.UpdateLabel(false);
    }
}

public void CurrentTransactionStatus(StatusInfo info, Device device)
{
    //Let also console log the status during the transaction
    Console.WriteLine("*** CurrentTransactionStatus *** " + info.Status.ToString());
}

Create the UpdateLabel method in Form1.cs

public delegate void UpdateConnectionLabel(bool Connected);
public void UpdateLabel(bool Connected)
{
    //Only need to check for one of the webbrowsers
    if (ConnectionLabel.InvokeRequired)
    {
        UpdateConnectionLabel d = new UpdateConnectionLabel(UpdateLabel);
        this.Invoke(d, new object[] { Connected });
    }
    else
    {
        if (Connected)
        {
            ConnectionLabel.Text = "Connected";
            ConnectionLabel.BackColor = Color.Green;
        }
        else {
            ConnectionLabel.Text = "Disconnected";
            ConnectionLabel.BackColor = Color.Red;
        }
    }
}
Let´s display the receipts at the end of a transaction!
1. Fetch the cardholder's and merchant receipts from the method EndOfTransaction in MyClass At this point all the buttons are connected but we are still missing to display the receipts in the webBrowsers. First, let´s get the receipts from the method EndOfTransaction in myClass.cs.
public void EndOfTransaction(TransactionResult transactionResult, Device device)
{
    Console.WriteLine("*** EndOfTransaction *** " + result.ToJSON());
    uIClass.DisplayReceipts(result.MerchantReceipt, result.CustomerReceipt);
}
2. Create the DisplayReceipts method in form1.cs
public delegate void UpdateReceiptsCallback(string MerchantReceipt, string CustomerReceipt);
public void DisplayReceipts(string MerchantReceipt, string CustomerReceipt)
{
    //Only need to check for one of the webbrowsers
    if (MerchantReceiptBrowser.InvokeRequired)
    {
        UpdateReceiptsCallback d = new UpdateReceiptsCallback(DisplayReceipts);
        this.Invoke(d, new object[] { MerchantReceipt, CustomerReceipt });
    }
    else
    {
        MerchantReceiptBrowser.DocumentText = MerchantReceipt;
        CardholderReceiptBrowser.DocumentText = CustomerReceipt;
    }
}
Final Result!
Here is how MyClass.cs and Form1.cs must eventually look like :
1. MyClass.cs :
using System;
using System.Collections.Generic;
using System.Numerics;
using com.handpoint.api;

namespace GettingStartedApp
{
    class MyClass : Events.Required, Events.Status
    {
        Hapi api;
        Device myDevice;
        private Form1 uIClass;

        public MyClass(Form1 form1)
        {
            uIClass = form1;
            InitApi();
        }

        public void InitApi()
        {
            string sharedSecret = "0102030405060708091011121314151617181920212223242526272829303132";
            api = HapiFactory.GetAsyncInterface(this, new HandpointCredentials(sharedSecret));
        }

        public void DiscoverDevices()
        {
            api.SearchDevices(ConnectionMethod.BLUETOOTH);
        }

        public void DirectConnect()
        {
            Device device = new Device("PP0513901435", "68:AA:D2:00:D5:27", "", ConnectionMethod.BLUETOOTH);
             api.Connect(device);
        }

        public bool Pay()
        {
            return api.Sale(new BigInteger(1000), Currency.GBP);
        }

        public void Disconnect()
        {
            api.Disconnect();
        }

        public void ConnectionStatusChanged(ConnectionStatus status, Device device)
        {
            Console.WriteLine("*** ConnectionStatus *** " + status);
            if (status == ConnectionStatus.Connected)
            {
                uIClass.UpdateLabel(true);
            }
            else
            {
                uIClass.UpdateLabel(false);
            }
        }

        public void CurrentTransactionStatus(StatusInfo info, Device device)
        {
            //Let's log also the status during the transaction
            Console.WriteLine("*** CurrentTransactionStatus *** " + info.Status.ToString());
        }
        public void DeviceDiscoveryFinished(List Device devices)
        {
            foreach (Device device in devices)
            {
                if (device.Name != null)
                {
                    if (device.Name.Equals("PP0513901435"))
                    {
                        this.device = device;
                        api.Connect(this.device);
                    }
                }
            }
        }

        public void EndOfTransaction(TransactionResult result, Device device)
        {
            Console.WriteLine("*** EndOfTransaction *** " + result.ToJSON());
            uIClass.DisplayReceipts(result.MerchantReceipt, result.CustomerReceipt);
        }

        public void SignatureRequired(SignatureRequest signatureRequest, Device device)
        {
            api.SignatureResult(true); // This line means that the cardholder ALWAYS accepts to sign the receipt.
        }

        public void HardwareStatusChanged(HardwareStatus status, ConnectionMethod hardware)
        {
            //Ignore
        }
    }
}
2. Form1.cs :
using System;
using System.Drawing;
using System.Windows.Forms;

namespace GettingStartedApp
{
    public partial class Form1 : Form
    {
        MyClass my;
        public Form1()
        {
            InitializeComponent();
            my = new MyClass(this);
        }

        private void PayButton_Click(object sender, EventArgs e)
        {
            my.Pay();
        }

        private void ConnectButton_Click(object sender, EventArgs e)
        {
            my.DirectConnect();
        }

        private void DisconnectButton_Click(object sender, EventArgs e)
        {
            my.Disconnect();
        }

        public delegate void UpdateReceiptsCallback(string MerchantReceipt, string CustomerReceipt);
        public void DisplayReceipts(string MerchantReceipt, string CustomerReceipt)
        {
            //Only need to check for one of the webbrowsers
            if (MerchantReceiptBrowser.InvokeRequired)
            {
                UpdateReceiptsCallback d = new UpdateReceiptsCallback(DisplayReceipts);
                this.Invoke(d, new object[] { MerchantReceipt, CustomerReceipt });
            }
            else
            {
                MerchantReceiptBrowser.DocumentText = MerchantReceipt;
                CardholderReceiptBrowser.DocumentText = CustomerReceipt;
            }
        }

        public delegate void UpdateConnectionLabel(bool connected);

        public void UpdateLabel(bool Connected)
        {
            //Only need to check for one of the webbrowsers
            if (ConnectionLabel.InvokeRequired)
            {
                UpdateConnectionLabel d = new UpdateConnectionLabel(UpdateLabel);
                this.Invoke(d, new object[] { Connected });
            }
            else
            {
                if (Connected)
                {
                    ConnectionLabel.Text = "Connected";
                    ConnectionLabel.BackColor = Color.Green;
                }
                else {
                    ConnectionLabel.Text = "Disconnected";
                    ConnectionLabel.BackColor = Color.Red;
                }
            }
        }

    }
}
Let's run our program!
Run the program by clicking the "play" button :
- Click on "Connect To Card Reader", this can take a little bit of time (10 sec max) due to the fact that we are looking for all the devices around before connecting to a specific one
- Click "Pay Now"
- Follow the instructions on the card reader
- When the transaction is finished, the receipts should be displayed in the webBrowsers
- Click on "Disconnect From Card Reader" to stop the connection with the card reader
Terminal Simulator Integration
Introduction
This tutorial is guiding you through all the steps to create a basic payment application for Windows using a card reader simulator. The simulator only has limited capabilities and we highly recommend that you order a development kit if you want to carry a full integration. The development kit contains a card reader as well as a test card and will allow you to test your integration from end to end.
The new generation of Handpoint SDK's is designed to make your life easier. Simple and created for humans, it does not require any specific knowledge of the payment industry to be able to start accepting credit/debit card transactions.
At Handpoint we take care of securing every transaction so you don´t have to worry about it while creating your application. We encrypt data from the payment terminal to the bank with our point-to-point encryption solution. Our platform is always up to the latest PCI-DSS security requirements.
Connecting to the simulator
The SDK offers a method in which you will need to specify the card reader to be used:
hapi.Connect(new Device("Name", "Port", "Address", ConnectionMethod.****))
Simply set the ConnectionMethod to Simulator, i.e. ConnectionMethod.Simulator. The SDK does the rest. You don't need to search via bluetooth for surrounding card readers when using the simulator.
hapi.Connect(new Device("Name", "Port", "Address", ConnectionMethod.Simulator))
Controlling responses
The simulator mimics the card reader as much as possible regarding information flow from the SDK interface to your application. It will return all the transaction statuses, transaction results and receipts.
Results of a transaction are controlled by the amount sent into the sale function:
The 3rd position from the right sets the desired financial status, 0 = Authorized and 1 = Declined.
The 4th position from the right sets the desired verification method, 0 = Signature and 1 = PIN.
hapi.Sale(X10XX, Currency.GBP); // amount = X 10 XX - where X represents an integer [0;9]
- X 00 XX = Signature authorized
- X 01 XX = Signature declined
- X 10 XX = Pin authorized
- X 11 XX = Pin declined
Let's start programming!
1. Create a C# class Create a new C# class called MyClass and include com.handpoint.api as a dependency :
    using System;
    using System.Collections.Generic;
    using System.Linq;
    using System.Text;
    using com.handpoint.api;

    namespace GettingStartedWithSimulator
    {
        class MyClass
        {
        }
    }
2. Initialize the API
    using System;
    using System.Collections.Generic;
    using System.Linq;
    using System.Text;
    using com.handpoint.api;

    namespace GettingStartedWithSimulator
    {
        class MyClass
        {
            Hapi api;

            public MyClass()
            {
                InitApi();
            }
            public void InitApi()
            {
                string sharedSecret = "0102030405060708091011121314151617181920212223242526272829303132";
                api = HapiFactory.GetAsyncInterface(this, new HandpointCredentials(sharedSecret));
                // The api is now initialized. Yay! we've even set a default shared secret!
                // The shared secret is a unique string shared between the card reader and your mobile application.
                // It prevents other people to connect to your card reader.
            }
        }
    }
3. Implement the mandatory Events(Events.Required)
    using System;
    using System.Collections.Generic;
    using System.Linq;
    using System.Text;
    using com.handpoint.api;

    namespace GettingStartedWithSimulator
    {
        class MyClass : Events.Required
        {
            Hapi api;

            public MyClass()
            {
                InitApi();
            }

            public void InitApi()
            {
                string sharedSecret = "0102030405060708091011121314151617181920212223242526272829303132";
                api = HapiFactory.GetAsyncInterface(this, new HandpointCredentials(sharedSecret));
                // The api is now initialized. Yay! we've even set a default shared secret!
                // The shared secret is a unique string shared between the card reader and your mobile application
                // It prevents other people to connect to your card reader
            }

            public void DeviceDiscoveryFinished(List Device devices)
            {
                // Only needed when using a payment terminal
                //here you get a list of Bluetooth payment terminals paired with your PC
                // You can also get a list of serial / USB payment terminals attached to your computer

            }

            public void SignatureRequired(SignatureRequest signatureRequest, Device device)
            {
                // You'll be notified here if a sale process needs a signature verification
                // A signature verification is needed if the cardholder uses an MSR or a chip & signature card
                // This method will not be invoked if a transaction is made with a Chip & PIN card

                api.SignatureResult(true); // This line means that the cardholder ALWAYS accepts to sign the receipt
                // A specific line will be displayed on the merchant receipt for the cardholder to be able to sign it
            }

            public void EndOfTransaction(TransactionResult transactionResult, Device device)
            {
                // The object TransactionResult holds the different receipts
                // Other information can be accessed through this object like the transaction ID, the amount...
            }
        }
    }
4. Add a method to connect to the simulator
    public void Connect()
    {
        Device device = new Device("Name", "Address", "Port", ConnectionMethod.SIMULATOR);
        api.Connect(device);
    }
5. Add a method to take payments with the simulator
The simulator mimics the card reader as much as possible regarding the information flow from the SDK interface to your application. The results of the transaction (declined, authorized) and the type of verification method (PIN, signature) will depend on the amount used.
You can get different responses from the simulator by setting different values for the amount parameter, e.g. for a Sale function :
api.Sale(X10XX, Currency.GBP); // amount = X 10 XX - where X represents an integer [0;9]
Amount Values
- X00XX = Signature authorized
- X01XX = Signature declined
- X10XX = PIN authorized
- X11XX = PIN declined
The 3rd number from right sets desired financial status, Authorized or Declined. Default status is Authorized.
The 4th number from right sets desired verification method, Signature or PIN. Default method is Signature.
Let´s add 4 methods to MyClass in order to represent the 4 cases above :
    using System;
    using System.Collections.Generic;
    using System.Linq;
    using System.Text;
    using com.handpoint.api;

    namespace GettingStartedWithSimulator
    {
        class MyClass : Events.Required
        {
            Hapi api;

            public MyClass()
            {
                InitApi();
            }

            public void InitApi()
            {
                string sharedSecret = "0102030405060708091011121314151617181920212223242526272829303132";
                api = HapiFactory.GetAsyncInterface(this, new HandpointCredentials(sharedSecret));
                // The api is now initialized. Yay! we've even set a default shared secret!
                // The shared secret is a unique string shared between the card reader and your mobile application.
                // It prevents other people to connect to your card reader.
            }

            public void DeviceDiscoveryFinished(List <Device> devices)
            {
                 // Only needed when using a payment terminal
                 //Here you get a list of Bluetooth payment terminals paired with your PC
                 // You can also get a list of serial / USB payment terminals attached to your computer

            }

            public void Connect()
            {
                Device device = new Device("Name", "Address", "Port", ConnectionMethod.SIMULATOR);
                api.Connect(device);
            }

            public bool PayWithSignatureAuthorized()
            {
                return api.Sale(new BigInteger("10000"), Currency.GBP);
                // amount X00XX where X represents an integer [0;9] --> Signature authorized
            }

            public bool PayWithSignatureDeclined()
            {
                return api.Sale(new BigInteger("10100"), Currency.GBP);
                // amount X01XX where X represents an integer [0;9] --> Signature declined
            }

            public bool PayWithPinAuthorized()
            {
                return api.Sale(new BigInteger("11000"), Currency.GBP);
                // amount X10XX where X represents an integer [0;9] --> PIN authorized
            }
            public bool PayWithPinDeclined()
            {
                return api.Sale(new BigInteger("11100"), Currency.GBP);
                // amount X11XX where X represents an integer [0;9] --> PIN declined
            }

            public void SignatureRequired(SignatureRequest signatureRequest, Device device)
            {
                // You'll be notified here if a sale process needs a signature verification
                // A signature verification is needed if the cardholder uses an MSR or a chip & signature card
                // This method will not be invoked if a transaction is made with a Chip & PIN card

                api.SignatureResult(true); // This line means that the cardholder ALWAYS accepts to sign the receipt.
                // A specific line will be displayed on the merchant receipt for the cardholder to be able to sign it
            }

            public void EndOfTransaction(TransactionResult transactionResult, Device device)
            {
                // The object TransactionResult stores the different receipts
                // Other information can be accessed through this object like the transaction ID, the amount...
            }
        }
    }
Let's create a User Interface!
1. Create buttons
- Go to your user interface (usually Form1.cs[Design])
- Select View > Toolbox
- In the toolbox, under “Common Controls” drag and drop 5 button items to the user interface
- Select "button1" > Right-Click > Properties
- Change the attribute "Name" from "button1" to "ConnectToSimulator"
- Change the attribute "text" from "button1" to "Connect To Simulator"
- Change the attribute "Name" from "button2" to "PayWithSignatureAuthorized"
- Change the attribute "text" from "button2" to "Pay With Signature Authorized"
- Change the attribute "Name" from "button3" to "PayWithSignatureDeclined"
- Change the attribute "text" from "button3" to "Pay With Signature Declined"
- Change the attribute "Name" from "button4" to "PayWithPinAuthorized"
- Change the attribute "text" from "button4" to "Pay With Pin Authorized"
- Change the attribute "Name" from "button5" to "PayWithPinDeclined"
- Change the attribute "text" from "button5" to "Pay With Pin Declined"
2. Create WebBrowsers
Now that we have our 5 buttons let´s create two webBrowsers items to display the merchant receipt as well as the cardholder´s receipt at the end of the transaction.
- Select View > Toolbox > Common Controls > WebBrowser
- Drag and drop two web browsers to the user interface
- Select View > Toolbox > Common Controls > Label
- Drag and drop two labels to the user interface in order to identify the webBrowser items
- Change the attribute "Name" from the left webBrowser to "MerchantReceiptBrowser"
- Change the attribute "Name" from the right webBrowser to "CardholderReceiptBrowser"
- Change the attribute "Name" from "label1" to "MerchantReceiptLabel"
- Change the attribute "text" from "label1" to "Merchant Receipt :"
- Change the attribute "Name" from "label2" to "CardholderReceiptLabel"
- Change the attribute "text" from "label2" to "Cardholder Receipt :"
Let's link our user interface with methods!
1. Referencing the user interface(Form1.cs) in MyClass
In MyClass.cs, create an instance of Form1 called UIClass and initialize it. Instantiate MyClass and add form1 as a parameter for the Class.
    class MyClass : Events.Required
        {
            Hapi api;
            private Form1 UIClass;

            public MyClass(Form1 form1)
            {
                InitApi();
                UIClass = form1;
            }
2. Referencing Myclass in Form1.cs and link methods to the user interface
Go to Form1.cs[Design] and double click on the button "Connect To Simulator". By Double Clicking on the "Connect To Simulator" button you created a method called ConnectToSimulator_Click. Create a new instance of MyClass called "my" in Form1.cs then, inside the new method ConnectToSimulator_Click call the Connect() method from MyClass.
    using System;
    using System.Collections.Generic;
    using System.ComponentModel;
    using System.Data;
    using System.Drawing;
    using System.Linq;
    using System.Text;
    using System.Windows.Forms;
    namespace GettingStartedWithSimulator
    {
        public partial class Form1 : Form
        {
            MyClass my;

            public Form1()
            {
                InitializeComponent();
                my = new MyClass(this);
            }
            private void ConnectToSimulator_Click(object sender, EventArgs e)
            {
                my.Connect();
            }
        }
    }
Go back to Form1.cs[Design] and double click on each of the other buttons to automatically generate an OnClick method in Form1.cs. Link each of the buttons to the correct methods in MyClass.cs.
    using System;
    using System.Collections.Generic;
    using System.ComponentModel;
    using System.Data;
    using System.Drawing;
    using System.Linq;
    using System.Text;
    using System.Windows.Forms;
    namespace GettingStartedWithSimulator
    {
        public partial class Form1 : Form
        {
            MyClass my;
            public Form1()
            {
                InitializeComponent();
                my = new MyClass(this);
            }
            private void ConnectToSimulator_Click(object sender, EventArgs e)
            {
                my.Connect();
            }
            private void PayWithSignatureAuthorized_Click(object sender, EventArgs e)
            {
                my.PayWithSignatureAuthorized();
            }
            private void PayWithSignatureDeclined_Click(object sender, EventArgs e)
            {
                my.PayWithSignatureDeclined();
            }
            private void PayWithPinAuthorized_Click(object sender, EventArgs e)
            {
                my.PayWithPinAuthorized();
            }
            private void PayWithPinDeclined_Click(object sender, EventArgs e)
            {
                my.PayWithPinDeclined();
            }
        }
    }
Let´s display the receipts at the end of a transaction!
1. Fetch the cardholder's and merchant receipts from the method EndOfTransaction in MyClass
At this point all the buttons are connected but we are still missing to display the receipts in the webBrowsers. First, let´s get the receipts from the method EndOfTransaction in myClass.cs.
    public void EndOfTransaction(TransactionResult transactionResult, Device device)
            {
                UIClass.DisplayReceipts(transactionResult.MerchantReceipt, transactionResult.CustomerReceipt);
            }
2. Create the DisplayReceipts method in form1.cs
    public delegate void UpdateReceiptsCallback(string MerchantReceipt, string CustomerReceipt);
            public void DisplayReceipts(string MerchantReceipt, string CustomerReceipt)
            {
                //Only need to check for one of the webBrowsers
                if (MerchantReceiptBrowser.InvokeRequired)
                {
                    UpdateReceiptsCallback d = new UpdateReceiptsCallback(DisplayReceipts);
                    this.Invoke(d, new object[] { MerchantReceipt, CustomerReceipt });
                }
                else
                {
                    MerchantReceiptBrowser.DocumentText = MerchantReceipt;
                    CardholderReceiptBrowser.DocumentText = CustomerReceipt;
                }
            }
Final Result!
Here is how MyClass.cs and Form1.cs must eventually look like :
1. MyClass.cs :
    using System;
    using System.Collections.Generic;
    using System.Linq;
    using System.Text;
    using com.handpoint.api;
    namespace GettingStartedWithSimulator
    {
        class MyClass : Events.Required
        {
            Hapi api;
            private Form1 UIClass;
            public MyClass(Form1 form1)
            {
                InitApi();
                UIClass = form1;
            }

            public void InitApi()
            {
                string sharedSecret = "0102030405060708091011121314151617181920212223242526272829303132";
                api = HapiFactory.GetAsyncInterface(this, new HandpointCredentials(sharedSecret));
                // The api is now initialized. Yay! we've even set a default shared secret!
                // The shared secret is a unique string shared between the card reader and your mobile application.
                // It prevents other people to connect to your card reader.
            }

            public void DeviceDiscoveryFinished(List Device devices)
            {
                // Only needed when using a payment terminal
                //Here you get a list of Bluetooth payment terminals paired with your PC
                // You can also get a list of serial / USB payment terminals attached to your computer

            }

            public void Connect()
            {
                Device device = new Device("Name", "Address", "Port", ConnectionMethod.SIMULATOR);
                api.Connect(device);
            }

            public bool PayWithSignatureAuthorized()
            {
                return api.Sale(new BigInteger("10000"), Currency.GBP);
                // amount X00XX where X represents an integer [0;9] --> Signature authorized
            }

            public bool PayWithSignatureDeclined()
            {
                return api.Sale(new BigInteger("10100"), Currency.GBP);
                // amount X01XX where X represents an integer [0;9] --> Signature declined
            }

            public bool PayWithPinAuthorized()
            {
                return api.Sale(new BigInteger("11000"), Currency.GBP);
                // amount X10XX where X represents an integer [0;9] --> PIN authorized
            }
            public bool PayWithPinDeclined()
            {
                return api.Sale(new BigInteger("11100"), Currency.GBP);
                // amount X11XX where X represents an integer [0;9] --> PIN declined
            }

            public void SignatureRequired(SignatureRequest signatureRequest, Device device)
            {
                // You'll be notified here if a sale process needs a signature verification
                // A signature verification is needed if the cardholder uses an MSR or a chip & signature card
                // This method will not be invoked if a transaction is made with a Chip & PIN card


                api.SignatureResult(true); // This line means that the cardholder ALWAYS accepts to sign the receipt.
                // A specific line will be displayed on the merchant receipt for the cardholder to be able to sign it
            }

            public void EndOfTransaction(TransactionResult transactionResult, Device device)
            {
                UIClass.DisplayReceipts(transactionResult.MerchantReceipt, transactionResult.CustomerReceipt);
            }
        }
    }
2. Form1.cs :
    using System;
    using System.Collections.Generic;
    using System.ComponentModel;
    using System.Data;
    using System.Drawing;
    using System.Linq;
    using System.Text;
    using System.Windows.Forms;
    namespace GettingStartedWithSimulator
    {
        public partial class Form1 : Form
        {
            MyClass my;
            public Form1()
            {
                InitializeComponent();
                my = new MyClass(this);
            }
            private void ConnectToSimulator_Click(object sender, EventArgs e)
            {
                my.Connect();
            }
            private void PayWithSignatureAuthorized_Click(object sender, EventArgs e)
            {
                my.PayWithSignatureAuthorized();
            }
            private void PayWithSignatureDeclined_Click(object sender, EventArgs e)
            {
                my.PayWithSignatureDeclined();
            }
            private void PayWithPinAuthorized_Click(object sender, EventArgs e)
            {
                my.PayWithPinAuthorized();
            }
            private void PayWithPinDeclined_Click(object sender, EventArgs e)
            {
                my.PayWithPinDeclined();
            }

            public delegate void UpdateReceiptsCallback(string MerchantReceipt, string CustomerReceipt);
            public void DisplayReceipts(string MerchantReceipt, string CustomerReceipt)
            {
                //Only need to check for one of the webbrowsers
                if (MerchantReceiptBrowser.InvokeRequired)
                {
                    UpdateReceiptsCallback d = new UpdateReceiptsCallback(DisplayReceipts);
                    this.Invoke(d, new object[] { MerchantReceipt, CustomerReceipt });
                }
                else
                {
                    MerchantReceiptBrowser.DocumentText = MerchantReceipt;
                    CardholderReceiptBrowser.DocumentText = CustomerReceipt;
                }
            }
        }
    }
Let's run our program!
Run the program by clicking the "play" button, click on "Connect to simulator" and then Click on one of the payment types available and have a look at the receipts! Voila!